Set High Speed Continuous Shooting Speed for Canon Camera
Continuous Shooting mode is very important for those who wish to engage in high speed, action photography. If there's a blur of activity, the odds aren't in your favor that you're going to get the money shot with Single Shooting mode. It's simply too difficult to predict that something's about to happen and then to track the action with your camera to capture only one photo. One that matters, that is. Camera manufacturers know this and because they do, they came up with some ingenious technology that can help out tremendously. This technology revolves around something called "Burst" mode for Canon cameras and it's basically a function inside the camera that allows you to take multiple photos by simply holding your finger down on the shutter button. I do want to warn you though, I have a Canon Rebel T7i and I don't see the word Burst anywhere in the settings menu that controls this feature. I swear I used to see this word here and there, but at the moment, I can't remember where.
In today's post, I'd like to show you how you can set your Canon Rebel DSLR camera (T2i, T3i, T4i, T5i, T6i and T7i) to continuous shooting mode. I'd also like to share some pitfalls, or shall we say, things you should be aware of, for when you're working in this mode. While it's easy and fun to grab at least three shots per second, that fun doesn't last indefinitely and I'll tell you why.

Before I begin with the settings instruction, I want to fill you in on when you might use Continuous Shooting mode and what other settings might be necessary at the same time. Typically, you'll use this mode during action scenarios. As I said above, when there's too much going on for one shot, you raise the odds of capturing a photo that you can work with by upping the number of overall shots. Here's the thing though – during action scenarios, you're most likely going to be tracking a moving subject. Because both the subject and the camera will be in motion, it's important to set a shutter speed that's fast enough to avoid blur. While I can't give you the exact shutter speed right now because it will vary based on your conditions, I do cover this topic extensively in the post I wrote that discusses shutter speed, great photos and what to do. It's all there, so take a peek at that one.
Setting Continuous Shooting
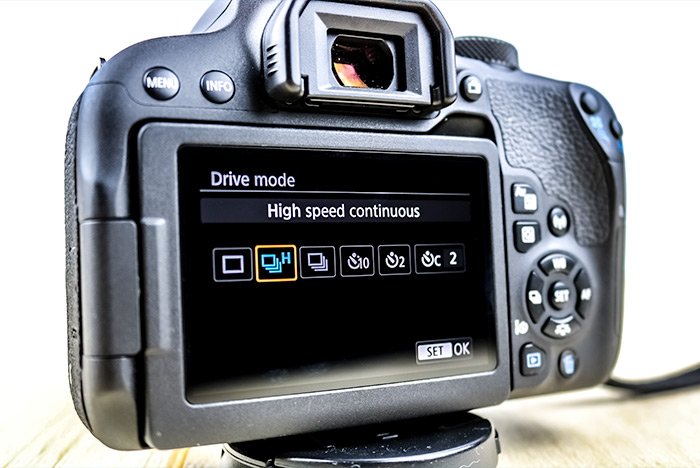
Okay, let's get to the actually setting here. To switch your camera from Single Shooting mode to Continuous Shooting mode, all you need to do is push the left arrow button on the back of your Canon Rebel when it's in viewfinder mode and then use the left and right arrow keys or the dial on top of the camera to select one of the continuous shooting modes. When you're finished with that, press the Set button to accept your changes. I say "one of the" because my T7i offers two different modes: High Speed Continuous and Low Speed Continuous. Back with the T3i et al, there was only one of these modes available. Having these two options is actually quite helpful though, which I'll discuss below.

The Limits of Continuous Shooting
I want you to run an experiment for me. I'd like you to set your camera to one of the modes I just discussed above and then hold down your camera's shutter button. As you do this, you'll notice that your camera takes a whole bunch of photos in rapid fire for a few seconds. After about five or so seconds pass though, you'll notice a marked reduction in pace and your camera will begin taking only about one photo per second. If you remove your finger from the shutter button, you'll notice a few numbers blinking on the rear of the camera as well as a red light on the rear as well. Let me tell you what's happening.
Every Rebel camera has a memory buffer built right into the camera. As you initially hold your finger on the shutter button, the camera begins capturing quite a few photos very quickly. Those initial photos are being stored in the buffer. As time passes though, the buffer fills and the camera transfers the images to the data card that you've got installed. Think of this as like RAM and a hard drive on your computer. A lot of the work you do is stored in RAM before it's actually moved over to the hard drive. Some is never moved to the hard drive. Apparently, when it comes to cameras, this built in memory is a lot faster than the data card and that's why the camera slows down so much as it's capturing the images. You'll even get to a point where you'll have to stop taking the photos because your camera needs some time to transfer them over to the data card. That's what the red light indicates. When the red light disappears, you can resume taking photos.
If you take advantage of the high speed burst mode, you'll initially take more photos, but it'll take longer to transfer all those photos over to the data card. If you use the low speed method, you'll capture the images less rapidly, but it'll be a smoother operation because there won't be as much of a backlog. Now, this is a trivial difference because both modes will create a backlog, but I thought I'd mention it anyway.
So there you have it. Instructions for how to set your Canon Rebel DSLR camera to Continuous Shooting mode as well as what to watch out for when taking photos. If you have any questions regarding this post, please let me know in the comment section down below or in the Canon discussion forum. Thanks for reading!
COMMENT: Hello! I have a Canon T3i D600. I can't get the burst mode to work in any of the shooting modes except sports. Do I have something set wrong? In all the manual modes when I press the shutter it won't release, I have to press it again. I've looked on the internet and my handbook for help and can't find anything pertaining to any of this. Your thoughts please, thank you!
Source: https://gaulard.com/forum/threads/720/
0 Response to "Set High Speed Continuous Shooting Speed for Canon Camera"
Post a Comment